Monday, April 30, 2012

Possibilities

Site Built Cherry Bar - Pre-Festool too
After years of woodworking, including owning a decent sized commercial cabinet shop for part of the time, I'm convinced that almost anything can be built on-site without expensive tools.  I'm even more convinced in the past year since buying a Festool Track Saw.  Your going to hear lots of continual praise about this tool on this blog.   I have no interest financial or otherwise in promoting this machine, other than recommending an useful tool.   In fact, for years I thought this was an unnecessary, overpriced piece of plastic, and swore I would never buy one.   It is probably overpriced, and it is plastic for sure.  But, it's well designed and engineered and ergonomically pleasing to use.   Festool could probably sell these for half the price in Home Depot and Lowes and still make a fortune, but in a way, the high price serves an indirect purpose in that it keeps away the non-serious amateur and non-professional professional woodworkers.  The tool needs to be treated and used delicately.  There are a few tricks and methods that you need to follow in order to not damage the tool or the track.  If they did sell them cheaply at Home Depot, at least half of them at least would end up being returned broken within a few days of sale.
Festool on the floor - Probably doesn't belong there, but safer than getting knocked off a bench
Speaking of the track saw, the top to my recent Cherry Mantle Project is a good example of where you can excel with a simpler, portable saw, in lieu of a more expensive shop and table saw.   This top, cut from 3/4" cherry veneer plywood, is five sided, with a cross section of almost four feet.  I wanted the grain of the wood to follow the front, long edge of the top.  This is a counter intuitive cut as using the right angle edge and side of the plywood would form the back two sides much easier.   The whole operation could be done with relative ease on a Felder Sliding Table Saw, but these cost $12,000 and need 3-Phase power and also, a 16'x24' clear area.   A conventional 10" cabinet saw would work, but you would need to spend a few hours building a fixture to hold the piece as you ran it through the saw. You also would get some tear-out on the cross grain cuts that would make for a semi-unsightly edge to glue the nosing to.   With the Festool is was as simple as drawing the five sides on the piece of plywood and cutting using the track - no clamps.  The edges were razor sharp on both sides with almost no visible tear-out.  I even was unhappy with the factory edge as it had been loaded and unloaded from trucks a few times and had some damage.  Using the track I cut an 1/8" off the edge to clean it up, prior to laying out the top.  Here is the finished piece, delivered and with the fireplace insert set.
Finished product
Back to the original photo - It looks complicated, but if you break it down, it's just some cabinet boxes with layers of plywood, solid wood, and trim built up using your basic trim carpentry techniques.  Even the fluting was done without a router table

Look Closely and you will see that it isn't that complicated.

Thursday, April 26, 2012

CORNER MANTLE - Part 1

The half-turnings from the previous post were destined for a free-standing corner mantle for a flueless gas fireplace.    I kept the design simple as most of the furniture in the room it is going in have fairly clean lines.  Cherry was requested as the material to be used, with a stained finish.  Cherry is probably my favorite wood to work with for one simple reason - it changes color as it ages and is exposed to sunlight.  It's hard to describe the effect but it seems cherry cabinets or built-ins always look richer, better, as they age.   If you have never worked with cherry and don't understand what I'm talking about - buy a fresh piece or buy it in the rough and plane it down - then put some masking tape partially across a small piece and place in sunlight - pull the tape off a few hours later and you will see the difference.  
Birch plywood core of base
So this piece starts with a base.  It's about 7" high with a small nosing.  The core is basic 3/4" shop-birch. The local lumber yard that I buy this from has it incredibly cheap - about $33 a sheet.  It hovered around $50 for 20 years.  It's not as nice as the non-Chinese product they used to sell, but if you are careful and pick your sheets you can find useable stuff.  I would never use it for a stained surface but for innards and for painting finishes it should work.  Speaking of materials, a list for this project - 

1 Sheet 3/4" shop birch plywood
1 Sheet 3/4" cherry veneer plywood
10' 1x8 Cherry surfaced four sides
7' 3" half round (cherry) molding
10' 4.5" crown (cherry)
some scrap cherry 8/4 for turnings and blocks
1.25" pocket screws
1.25", 1.625", and 1" drywall screws
1" and 2" brads
4 round feet - hardwood floor safe

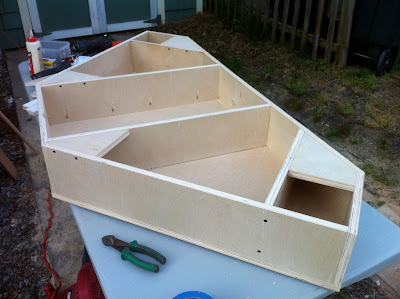
The top of the base, along with all the sides and cross pieces were cut out of the 3/4" shop birch using a Festool Track Saw and a Makita 10" sliding compound miter saw.  Remember, I'm portable so this whole unit was built in on a driveway - could have been built at the job or really anywhere.  The pieces were cut and screwed together using pocket screws drilled with a Kreg Jig and regular drywall screws. Remember to use a countersink bit and don't just shoot the screws in - you are less likely to snap the head off, have more control over the alignment of the pieces, and the sunk screw just looks neater.   I use a 12v Porter Cable Drill and a 12v Porter Cable Driver - came as a set for $130.  With an impact driver you really don't need more power than 12v, in fact, high power can snap screws easier.  Plus these drills are light and small.  The 12v drill is fine for the countersink bit, and can do the pocket holes, but it is really more efficient to just use a corded drill, since you will be drilling a lot of holes and can use the portable drill elsewhere.  I use a 16 year old 1/2" Dewalt corded drill.  Be sure to glue all pieces with yellow glue - I was using Titebond I for this project.
Flipped Over and Faced with 3/4" Cherry Ply
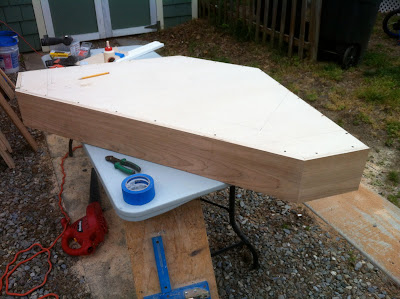
With the base turned right side up, I install 3/4" cherry plywood facing on the vertical surfaces.  22.5 degree cuts for the 45 degree corners.  Pieces are ripped to sit flush with birch top.  I glued them and tacked these in with 1" brads from a Paslode Brad Nailer - I use this for almost everything - cabinets, trim, ...etc.  I've been shooting 2" brads for years and almost never use finish nails.  Never had any problems despite other carpenters swearing I would.  Brads leave a nice little hole - some finish guns out there end up leaving wood looking like you stabbed it with a screwdriver.  Brads are cheaper and the guns that shoot them are cheaper too.  I do use yellow glue on my miters always too, which helps a lot.   I then secured the pieces from behind with 1.25" drywall screws (only to minimize the brad nails on this finished surface.  
Sides installed
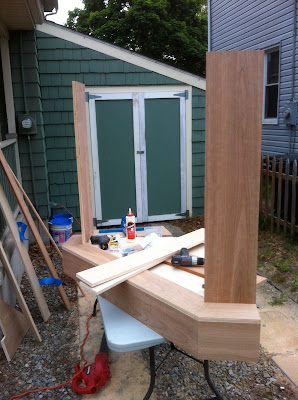
Next we add the base finished top - again, 3/4" cherry plywood glued nailed and screwed from behind. The 3/4" cherry sides are attached, using pocket screws, to the base.  Note the work table - I've been using these instead of saw horses lately.  They are 6' long, but fold in half along with the legs.  They store easy in my van and are more useful that horses.  $40 at Home Depot.
Mostly Done
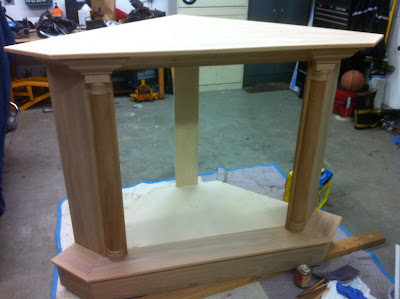
It's late and I'll jump ahead a bit.  To get to this point, I installed nosing on the base, 3/4" cherry ripped to about 1" wide and rounded on both sides with a 3/8" round over bit in a Bosch Router.  The nosing was mostly glued with a few brads to hold while glue set.  The top was cut from the sheet of 3/4" cherry plywood using the track saw.  Remember to orient the grain with the long front edge of the top.  This nosing was done the same way, except it was only glued on and held in place with masking tape while the glue dried. I also used the router AFTER the nosing was installed.  On the base I used it on the nosing BEFORE it was installed.  The front verticals are 3/4" solid cherry with a beveled edge to match that of the side.  I've pre attached the half round molding, the half-turnings, and the top blocks (cut from scrap 8/4 solid cherry) using glue and screws from behind.  Attaching these pieces to the plywood sides is a little tricky and involves using a scrap pine block, beveled to 45 degrees and glued and screwed to the side and the front verticals from behind.  The top is then attached using pocket screws and face screws from underneath and the 4.5" crown molding is installed with glue and 1" brads.   I did make a mistake and had precut the solid cherry header, abet, a little short then I ended up needing.  It's alway good to wait to cut things until you can hold the piece up and mark it.  Not having any extra 3/4" cherry I had to leave this piece out.  I'll buy some more cherry and cut it and slip it in behind the crown and attach using pocket screws.

This isn't my garage by the way.  I wish it was, but I'm borrowing a friends to finish this larger piece (not enough room to fit it in mine and work on it too)    I sanded all the surfaces with some 180 grit paper and then stained it using General Finishes water based dye stain.  Nice product - it doesn't smell at all and is ready to clear coat in two hours.  I wiped it on with a rag.

Stained

NEXT - Clear coating, installation, description of supports,..etc. behind finished face, and final product.


Wednesday, April 25, 2012

HALF TURNINGS

I'm working on a project that requires two approximately 36" tall half columns on either side, in cherry.  Now you can find some of this sort of thing through a variety of suppliers, however, they are both expensive and only made in very specific heights, usually geared toward kitchen cabinet heights.  I won't be sure of the exact height until I assemble things so wanting to be able to field adjust things, provide an unique, one of a kind design, and save a few bucks, I ordered a 3" half round cherry molding from a local millwork supplier, and turned the capital and the base for each column out of some cherry I had laying around.

In the Jet Midi Lathe
There is a trick to making half turnings - glue up two boards to equal the total diameter you want, but put a piece of paper between them during the glue up.  The boards will hold together well enough to turn, but after, whack the joint from the end with a chisel and the two perfect mirror halves will pop apart.   For this project I glued two 8/4 boards,  jointed on the glue face, with Titebond 1 yellow wood glue.  Be sure to clamp well.
Notice the paper in the glue joint.  
A word on the lathe and my turning tools - I use a small Jet Midi Lathe that I bough about 10 years ago for $200.  Now they are around $500 or more, but have variable speed.  On mine to adjust the speed you need to shift the belt on the v-pulleys - this is actually real easy and fast to do.  I use a set of very cheap, old Craftsman turning tools - a parting tool, a skew, a gouge, and some sort of slightly curved tool that I have no idea the name of.  I keep them sharp using a 6" Ryobi grinding, making sure to keep them cool when grinding.  I'm running out of steel on them so I might have to invest in a set of new tools soon.
Splitting the piece
Finished product in profile


WELCOME

My name is Jim Musser.  I've been a woodworker since I was 12 or so and for the past 20 years, a professional woodworker.  Currently I am a project manager for a construction company in Southern New Jersey that specializes in home remodeling, but I still manage to come home covered in saw dust more often than not.  I've been blogging about my model railroading and other hobbies at mussersteelmill.blogspot.com for about four years but never really though about posting any of my wood projects until now - not that I even have time to keep the other blog updated as much as I'd like.

My philosophy - I wouldn't call myself a Fine woodworker - I don't spend hours getting my chisels and plane blades razor sharp; I don't build intricate tables and chairs using stepped mortice and tenons.  I wish I could, but more importantly I wish I could make a decent living doing that type of art, but I can't.   I am skilled in a different way - I can copy almost anything from a photo or drawing, and I can usually build it pretty fast, in a neat and precise manner.   To do so I find efficiencies wherever possible, which makes my type of woodworking probably more accessible to a broader audience.  I don't have an elaborate shop and in fact, build most of my pieces on-site using cheap, portable tools.  My only splurge is a Festool Track Saw, which I find invaluable to site built cabinetry and architectural millwork.    Back to my shop - it's roughly 10'x7' and mostly filled with stored equipment.  I have an old Craftsman Bandsaw that needs new tires and is only there for sentimental reasons - I bought it when I was 12 or 13.   I have my Grandfather's old benchtop Rockwell drill press, a 20 year old Delta miter saw, a Delta 12" disc sander, a Ryobi grinder, and a Jet midi lathe.

My posts will vary from project photos, how to posts, tool reviews, tips and tricks, and whatever else I'm up to at that time.

For now, a recently completed built-in project.  Fairly simple design.  No dadoes, mortices, biscuits, just glue and mechanical fasteners - built in it's entirety about five feet from it's installed location.  All finishes were brushed on.  I'll cover the construction in a later blog sometime.

Simple and fast

Closest Column conceals a steel post.  Shelves are adjustable.
Yes, I could have done real raised panels on-site, but the budget was limited so simple, mitered, ogee basecap serves as "faux" panels.